Electrical System Protection, Pressure Pro, Trik-L-Start, Supplemental Inverter
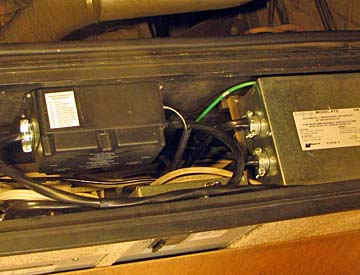
EMS Electrical Power Management System Over the past several years, I have heard many horror stories about damage caused to motorhome electrical systems and appliances due to defective campground wiring. I have been fortunate so far, and never encountered anything which was serious enough to cause any damage. I don't know how much longer my luck will hold out. At an FMCA convention in Pomona last year I finally decided to do something. I bought an EMS HW-50C Power Management System This is a box which is wired internally in the motorhome in line with the power input cord. It will check for over voltage, under voltage, incorrect frequency, and check for any open or reversed connections. It also provides 5 modes of surge protection. It provides an optional delayed startup to protect air conditioner motors from re-starting too soon, if you don't already have that protection elsewhere. The unit also comes with a remotely mounted monitor panel which displays the voltage and the current draw on each side of the line, the frequency, and any error codes which would indicate a problem. The bottom line is that if there is anything wrong with the campground power, it will not let your motorhome connect to it. If you decide that the problem the box detected is not serious and you want to connect anyway, there is a bypass switch on the remote which will bypass all the protections except the surge protection. I decided to connect the system after the power passes the generator
transfer switch so I would have protection for both the external power
line and the generator output. Although uncommon, there are many
ways a generator can fail and cause a dangerous situation.
Installation was straight forward, although handling the #6 wire was difficult. I was able to re-route the cable leaving the generator transfer switch to the EMS system. A new length of #6 romex was then run from the EMS box to the transfer switch.. I intially mounted the remote directly on the EMS box under the bed
so as to not have to run any more cables at that time. Several months
later, after I removed the Vena tank level gage, I re-assigned several
of the wires to my new level gage, to free up one of the cables.
I then used that cable to run from the EMS box to the side of the pantry
where I mounted the monitor.
I am very pleased with the final result, although the red LED characters
of the monitor are too bright. When I can find some, I plan to put
a piece of smoked plexiglas over the display to dim the output.
Pressure Pro Tire Monitor I have been looking at the various tire pressure monitors for several years now. I really am impressed by the ones which mount inside the tires on the rims as they provide both temperature and pressure data, and have no external units on the valve stems. After reading about some of the problems on tire monitors in general I decided on the Pressure Pro system. This unit uses a sending unit screwed onto each valve stem of the motorhome and the toad wheels. It measures pressure and has low pressure alarms, but does not measure temperature. Although I would like to have the temperature read outs, I decided that it was far less important than the pressure readings. As far as reliability, I doubt there are any fewer problems with Pressure Pro's "transmitter on the valve stem" approach, but at least you can access all the parts without having to dismount your tires. Pressure Pro operates by having a small pressure sensor/transmitter screwed onto each valve stem. These radio signals are picked up by the monitor panel, which can display the actual tire pressue of each tire. It will also sound an alarm if any tire loses too much pressure. To extend battery life, under normal situations each sensor only transmits the tire pressure once every 5 minutes. When the pressure drops by 12 1/2%, the sensor transmits much more frequently and causes the monitor to sound an alarm which can be silenced. If the pressure drops by 25%, it sends an alarm which cannot be silenced (other than by turning off power). My initial experience with the Pressure Pro left much to be desired! During my initial installation and calibration, I had to swap several transmitters to get ones that would read from the rear wheels. In addition to that, I had to move the monitor around to be able to pick up some of the wheels during calibration. My first drive home from the rally where I bought them resulted in only seeing 2 or 3 motorhome wheels at a time, and no toad wheels, in spite of locating the monitor in three different positions during the trip. I had bought their remote antenna, but it had to be shipped as it was out of stock at the rally. After receiving the antenna, I tried several locations, finally settling on mounting it in my utility compartment. This seemed to be quite reliable at receiving all 6 motorhome wheels, and I assumed that when I hooked the toad behind, it would also pick them up. The first time I drove on the road with my toad, it reliably read all 6 motorhome tires, but it failed to pick up a single toad wheel. I contacted Pressure Pro and received excellent support. They
ended up testing and swapping my monitor for a new one. This one
worked beautifully! It is much more sensiteve. I now reliably
pick up all 10 wheels with a very quick initial lock-on. I even pick
up all 4 of my toad wheels when it is parked in the garage, some 30 feet
away from the motorhome.
I had delayed my permanent mounting until everything worked correctly.
I made an aluminum bracket and attached it below the dashboard to the left
of the steering wheel. I hard wired the 12 volt power to the old
monitor select switch, which is no longer used since I made my new tank
monitor. I left the external antenna connected for optimum performance.
Trik-L-Start The converter in my Foretravel, as with most motorhomes, only charges the house batteries. The only charge the starting batteries receive is from the alternator when the engine is running, and a small solar panel.when parked outside. Even though I always leave my coach plugged in between trips, I have to be very careful to turn on the boost switch every couple of weeks for a day or two. If I don't, the starting batteries will slowly discharge and will not start the engine. I'm afraid I know this from personal experience! I have been reading about a couple of commercial products which "steal" a small portion of the charging current to the house batteries and trickle charge the starting batteries. I decided on the Trik-L-Start product from LSL industries. It will charge up to 5 amps and has circuit protection for all the necessary electrical and temperature ranges. Installation was very simple, consisting of drilling two holes, mounting
the unit, and connecting three wires.
I have high hopes that my starting batteries will always be fully charged
in the future.
Note of 8/1/2017 The Trik-L-Start truly has kept my starting batteries
fully charged since installing it over 10 years ago! It just
works! I no longer have to turn on the boost switch periodically.
Supplemental Inverter I love my ProSine inverter! It produces plenty of power which is cleaner than the power company's. Unfortunately, it draws a lot of standby power. With just the parasitic power draws in the coach, it pulls about 5 amps of 12 volts. That is 120 amp hours of battery used every day without turning on any electrical appliances. I wanted to be able to dry camp more efficiently, so I decided to install a lower power modified sine wave inverter. I had a 750 watt inverter which draws only about 1/6 amp on standby, and converts power at about a 90% efficiency. I selected one motorhome circuit which supplies the TV and satellite receiver along with several convenience outlets and installed a change-over switch. In one position this circuit is powered by the main power panel. In the other position it is connected to the inverter. It is important to know that if you do an installation similiar to this, be sure to switch both the neutral and the hot (white and black) wires. If you only switch the hot wire, there can be sneak paths through the power distribution system that WILL blow your inverter! I have used this setup several times now while dry camping and it significantly
extends my battery charge life. Instead of the 120 amp hours a day,
this inverter uses less than 4! If I need to use a high power device
like the microwave, I can still turn on the ProSine and use it as long
as needed, then turn it off again.
Update of 1/1/10 About a year ago I suffered a failure of my Prosine inverter and had to replace it. I replaced it with a 2000 watt Prosine unit of a brand new design. This inverter draws only about 2 amps at idle compared with about 5 for my previous one. Based on the improvement in efficiency of my primary inverter, this inverter, although it still is more efficient, does not save nearly as much as it did with my old Prosine. I probably would not have installed this supplimental unit had I had my present inverter when I did all my measurements and calculations. This 750 watt inverter is cooled by a small, high speed fan of about 1 1/2 inches square. It runs at about 8000 rpm, so is quite noisy. It was a sleeve bearing fan and the bearing started to chatter. This not only increased the noise level, but significantly lowered the cooling. I decided to replace the fan with a larger, slower speed ball bearing unit.. As I didn't have the need to keep the package neat and compact like the original designer, I decided to mount the fan on the top surface of the inverter case. I removed the components from the case and drilled 7 holes to allow air flow into the case. I blocked the original small openings on the end plate where the small fan was mounted. I machined an oak block and attached it to the case using silicone sealant. This block is the size to mount the about 3 1/2 inch square fan. A safety screen over the fan completed the mods. The new fan runs with a fairly quiet "swish" instead of the annoying "buzz" the old fan made. I seem to be getting plenty of air flow through the case, so should not have any cooling problems.
Richard Mason, Prescott, AZ 4/5/07
|